Wind Racers

Wind Racers

Aim:

To time how long it takes to get to a certain distance and to calculate the wind racer’s speed by using the time(s) and the distance travelled(m).

Method

– Equipment:

  • Paper
  • Wooden base
  • Bamboo sticks
  • Tape
  • String
  • Cardboard
  • Lego figure
  • Coloured pens
  • Pens/Pencils
  • Glue stick

– Making process:

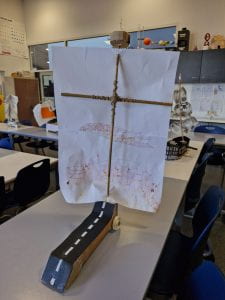
  • First, we put two bamboo sticks together in a cross shape and tied them together with a string.
  • We attached the cross to the wooden base
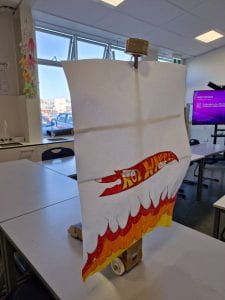
  • Then we used two pieces of paper and taped them together to make a mast and we even drew a Hot Wheels logo to the flag to do our design.
  • We taped grey/black paper to the wooden base and glued white lines to the black paper so it looked like a road on the wooden base.
  • We then made a mini car out of cardboard and taped it on the road.
  • Later after we put the mast on the cross we added a cardboard crow’s nest to the top of the cross to put the Lego figure in.
  • When we finished our wind racer design which was Hot Wheels we checked for any holes on the wind racer that might not catch wind that could make the wind racer move.

– Wind racer end design:

.

– Racing:

  • To do the racing all we had to do was set the wind racers back at the zero mark of a tape measure on the ground and then we had to start a leaf blower that would push the wind racer along the tape measure and we would have to turn off the leaf blower when it would get to a certain distance. The wind racer might go a little further along the tape measure even when the leaf blower gets turned off which would be our distance travelled (m) wherever it stops. We also had to time the wind racer and stop the timer when it got to a certain distance, whatever time it stopped would be the time(s).

Results:


Discussion:

– What are the forces acting on your wind racer?

  • Air resistance
  • Thrust/push
  • gravity

– Are they balanced/unbalanced?

  • The forces are unbalanced due to the windracer moving in one direction meaning there is more force moving it in one certain direction. The diagram below shows the wind racer has more force pushing it forward(left) making it move forward to the left instead of backwards to the right.

Diagram:

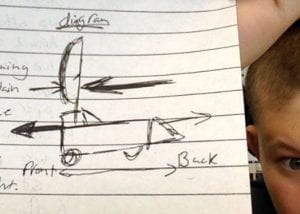
(don’t mind the top arrows)

– What is net force and how does it relate to the forces acting on your wind racer?

  • Netforce is total force. For the wind racer, there is a greater force moving it in one direction and there is a smaller force trying to stop it.

– What are the strengths of forces acting on it at different stages?

Start:

  • At the start, there is more pressure applied due to needing enough force to push it forward to get it to start moving.

Middle:

  • The wind racer should be at a constant speed or even speeding up due to the forces getting up to strength where it is already getting the wind racer moving.

End:

  • The wind racer at the end should be slowing down due to there being less wind/pressure pushing it forward. Soon bringing it to a balanced force since it is stopping and staying still.

– Why do you think results may vary in the class?

– Human error

– Design

  • More surface area for the wind/pressure to push on to make it go more of a distance faster.
  • Less weight on the cart making it easier/lighter to push/move.

Conclusion:

– How was your wind racer successful/unsuccessful and why?

  • My wind racer would be both successful and unsuccessful
  • It got quite a long distance in the end but it did take it quite a long time to get to said distance. The large mast did help it get to said distance but we didn’t attach the cross to the wooden base well enough so it spun around and didn’t catch the wind much.

– How could you improve it?

  • I think I could have attached the cross to the wooden base better which would’ve helped it not spin and would have made it move further.


Oobleck

Oobleck

Aim:

I want to find out how to make Oobleck


Research:

Ingredients

Instructions

Method:

Equipment:

  • Cornflour
  • Water
  • Food coloring
  • plastic bowl or bin

Instructions:

  1. get equipment
  2. Measure 1 cup of water
  3. Measure 1 and 1/2 cup of cornflour
  4. put the water and cornflour into the plastic bowl and mix it together
  5. if the mixture is still too dry and doesn’t turn into a liquid when left alone add a little bit more water
  6. and if the mixture doesn’t turn into a solid when moved around with force add more cornflour
  7. the proper mixture should be a liquid when there isn’t any force applied to it, and it should be a solid when force is applied

Multivariate Analysis

Multivariate Analysis


Problem:

I wonder if the median typing speed of males is faster than the typing speed of females for all hornby high school students…


Plan:

  • Explanation of variables (units)

We gathered the data by…

  1. Watching people from each gender type 
  2. Used a website on a chromebook called human benchmark and getting people to write down on a spreadsheet the typing speed they got
  3. On the website it got students to write a paragraph. Students typing speed will be decreased for inaccuracies.

Analysis

  • Center:

The median typing speed of females is 37 (wpm). The median typing speed of males is 58 (wpm). We can see that males are faster than females by 21 (wpm)

  • Spread:

IQR + UQ – LQ

F + 53 -32 =21

M = 29

The IQR for females is 21 (wpm)

The IQR for males is 29 (wpm)

We can see that males have more variety in typing speed than females.


Conclusion:

Because the median typing speed of males is significantly higher than females, there is enough evidence that males are faster than females at Hornby High School


Nuclear Energy

Nuclear Energy

Aim:

I want to find out how to make grape plasma

Research:

Method:

Equipment:

  • Microwave
  • Any type of grapes
  • Tall glass cup
  • Safety glasses
  • Knife

Instructions:

  1. Get your equipment ready
  2. Be safe – Safety glasses And NO METAL IN THE MICROWAVE.
  3. Cut the grape from top to bottom, but not all the way. Leave a small strip of grape skin
  4. Put the grape in the microwave
  5. Put the cup over the grape
  6. Put the microwave on high for 1 min
  7. Observe.

Results:


Discussion:


Chemical Energy

Chemical Energy

Aim:

I want to find out how to make coloured fire

I want to investigate what is chemical energy

Research:

Equipment:

  • safety glasses
  • Heating equipment
  • Different salts
  • wire loop
  • small beaker of nitric acid

Instructions:

  1. Get equipment ready
  2. Be safe
  3. Set up the Bunsen burner
  4. Clean the wire loop in the acid
  5. Dip the wire loop into the salt of your choice
  6. put the salty wire into the blue flame of the Bunsen burner
  7. observe what happens
  8. Repeat instructions 4-6

Results:


Discussion:


Dilution

Dilution

Aim:

To dilute a liquid

Research:

Method:

Equipment:

  • Clear cup
  • Food dye
  • Water
  • Measure cup

Instructions:

  1. Get equipment
  2. Pour 1 cup of water into the clear cup
  3. Add a drop of food dye to the water
  4. Get another clear cup
  5. Add 1/2 cup of water into the empty cup
  6. Then pour half of the coloured water into the glass half full of normal water
  7. Repeat again and again until the water starts to become colourless

Result:

Discussion:

Dilution is the process of adding a solvent into a mix of a two solvents or solvent and solute over and over again until it is mainly the solvent you have added. If you take a glass of water and add a drop of food dye and then get another glass and then add half of the dyed water into the empty glass and then add more water, it would be more diluted that the first glass of water but if you keep repeating the steps it would be mainly water and the dye would be mostly gone.


Chromatography

Chromatography

Aim:

I want to find out how to separate coloured chemicals from ink.
Research:

Method:

Equipment:
  • Safety Glasses
  • 250mL Beaker
  • water
  • pencil
  • filter paper
  • marker/felt pen
  • scissors
Instructions:
  1. Get your equipment ready and be safe.
  2. Add 1cm of water to the beaker.
  3. Cut a strip of filter paper.
  4. Draw a pencil line 2cm above the bottom.
  5. Draw a coloured dot with the marker pen in the middle of the pencil line.
  6. Fold down the top of the filter paper so that hook over the edge of the beaker.
  7. Put the filter paper into the water so that the pencil line DOES NOT go into the water.
  8. Once the water goes up the paper, take it out and let it dry.

Results:

Discussion:

The solvent makes the solute rise. The solvent is the water that the filter paper is placed in and the solute is the ink which rises with the solvent. When the solvent moves up the filter paper the solvent carries the solute up the paper making the dot spreading colour and moving the colours above the dot.

Filtering Dirty Water

Filtering Dirty Water

Aim:

I to find out how to filter dirty water.

Research:

METHOD:

Equipment:

  • Scissors
  • Water bottle
  • Handful of cotton
  • Sand
  • Charcoal
  • Gravel/Pebbles
  • Dirty water

Instructions:

  1. Cut an empty litre bottle in half
  2. Place the upper bottle upside down
  3. Then place cotton down
  4. Add sand
  5. Then add charcoal in
  6. Then add gravel and pebbles
  7. You can now add your dirty water in and watch it be filtered

Result:


Discussion:

The water became cleaner than before because the impure particles couldn’t fit through the filter paper, but the water could because it has finer particles so it would get through the filter paper. The water smelled weird and tasted a bit dirty but it looked pretty clean. The filtering did take a long time due to how much dirt we added to the water. We only filtered it once but we still drank it mainly because it did look clean and by it looked clean I mean it was clear and didn’t have any dirt that I could see.

Investigating State Changes

Investigating State Changes


Method:

Equipment:

  • Beaker
  • Bunsen burner
  • Ice
  • Salt (optional)
  • Tripod
  • Gause mat
  • Heat mat
  • Thermometer
  •  Stand
  • Clamp
  • Timer/Stopwatch
  • Safety glasses
  • Matches/lighter

Instructions:

  1. Prepare your equipment.
  2. Set up the Bunsen burner but do not light it.
  3. Fill half of your beaker with ice and add 50 ML of water.
  4. Set up the stand and clamp the thermometer.
  5. Make sure the thermometer is not touching the bottom of the beaker.
  6. Measure the temperature of the ice.
  7. Light the Bunsen burner and heat the ice with a blue flame.
  8. Start timing.
  9. Every 30 seconds, record the temperature of the water.


Results:


The water reached 100 degrees and was boing while changing states from liquid/water to gas/water vapour.

Graph:

Discussion:

The ice turned from a solid to a liquid due to the temperature change around it. The reason the state changed from a solid to a liquid is because the energy around it was higher than the ice making it change from a solid with low energy to a liquid with higher energy. Water will melt at the same temperature it freezes but at room temperature, the ice would melt slowly. Still, because we didn’t want to wait so long we added it into a liquid which does already have more energy but then we added the flame from the bunsen burner which made the temperature rise faster. the particles in a solid are closer together and they don’t have as much energy as a liquid or a gas so they can only vibrate they also have a fixed shape compared to a liquid, a liquid doesn’t have a fixed shape and the particles have more energy but not as much as a gas so they can’t break the bonds but they can move more than a solid because a liquid has more energy so the particles and move over the other particles. energy breaks the forces thee molecules together and if a solid gets more energy it turns into a liquid but it the liquid get more enrgey it will change into a gas

Art

Art

In art class, we have been preparing to make a big painting in art. To prepare we have been practising different art styles and making smaller versions of what we want to draw just to make sure we know what we want to draw.


Art styles:

Finished art:

My finished art was good but not good it used most of the styles of painting that we had to use. It also uses Pacifica art style and manga which was also styles that we had to use.


The 4 art forms we have been studying are manga, Pasifika, art nouveau and kowhaiwhai. My 2 favourites are Pasifika and manga because they are the easiest to draw.

I just thought it looked good with the colours. I went with those colours due to I wanted it to be more of a natural kinda themed painting but it kinda didn’t work out.

What I have learnt are just more painting styles. My favourite paint techniques are dry brushing and layering because they are just the paint techniques that I am used to.

The difference is that warm colours are brighter and cool colours and darker and have more of a cooler feeling and warm are the opposites. Warm and cool colours are also on the opposite sides of the colour wheel.

Nah not really it thought it would look better but i kinda kept running out of one colour and then i would have to make that colour again but it wouldn’t be the same.

I would change most of the colours just to make it more of the same colour instead of having to layer the colours so make it the same colour.